Stop Guessing: Why You Must Know How to Calculate Superheat
Are you looking for a foolproof guide on how to calculate superheat accurately every single time? You are in the right place.
For decades, lazy technicians relied on the “beer can cold” method. They would grab the suction line with their bare hand, feel that it was chilly, and assume the air conditioner was perfectly charged. In 2026, with high-efficiency SEER2 systems and expensive scroll compressors, the “beer can” method isn’t just unprofessional—it is a guaranteed way to destroy a compressor and get fired.
Whether you are diagnosing a system that isn’t cooling properly, charging a new split system, or studying for your NATE certification, understanding superheat is non-negotiable.
In this comprehensive technical guide, we will break down exactly what superheat is, the tools you need, and the step-by-step math to figure it out on the job site.
📊 Test Your Thermodynamics
Do you know the difference between sensible and latent heat? Take a quick diagnostic quiz to see if your refrigeration cycle knowledge is sharp.
What is Superheat and Why Does It Matter?
Before we dive into the exact steps on how to calculate superheat, let’s define what it actually means.
Superheat is the amount of sensible heat added to a refrigerant after it has completely boiled off (evaporated) into a vapor.
Why do we care? To protect the compressor.
A compressor is designed to pump vapor, not liquid. If liquid refrigerant travels down the suction line and enters the compressor, it causes “liquid slugging.” Since liquids cannot be compressed, this will literally tear the internal valves and scroll plates apart.
Superheat proves that 100% of the liquid refrigerant in the evaporator coil has boiled into a gas, and then gained a few extra degrees of safety margin before heading back to the compressor.
The Tools You Need
Many apprentices ask how to calculate superheat without expensive digital gauges. The truth is, you can do it the “old school” way, but you need three highly accurate tools:
- Manifold Gauges: To read the vapor (suction) pressure on the low side (the blue gauge).
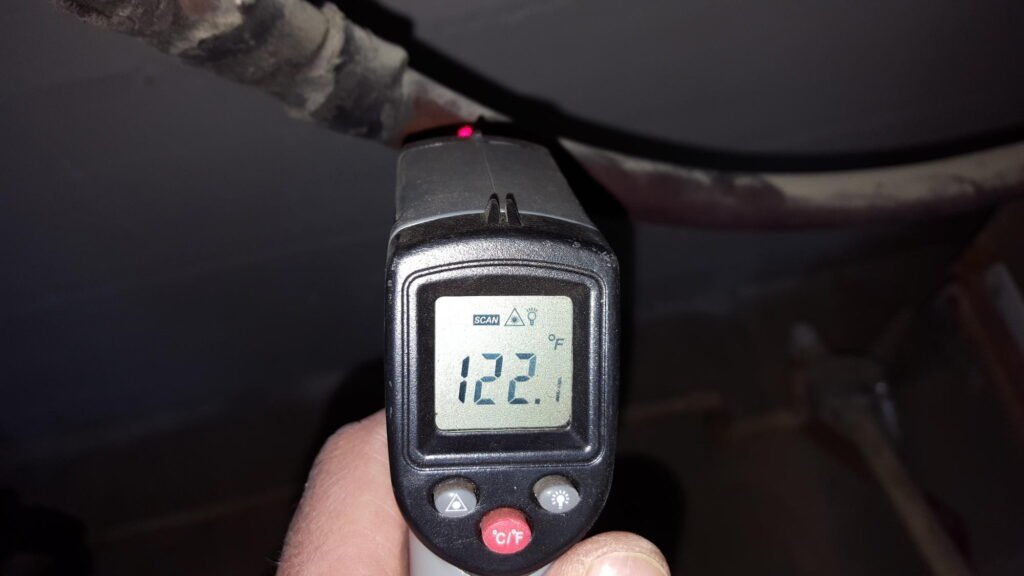
- Pipe Clamp Thermometer: A high-quality K-type thermocouple to strap onto the suction line. A laser thermometer or infrared gun will not work accurately on reflective copper pipes.
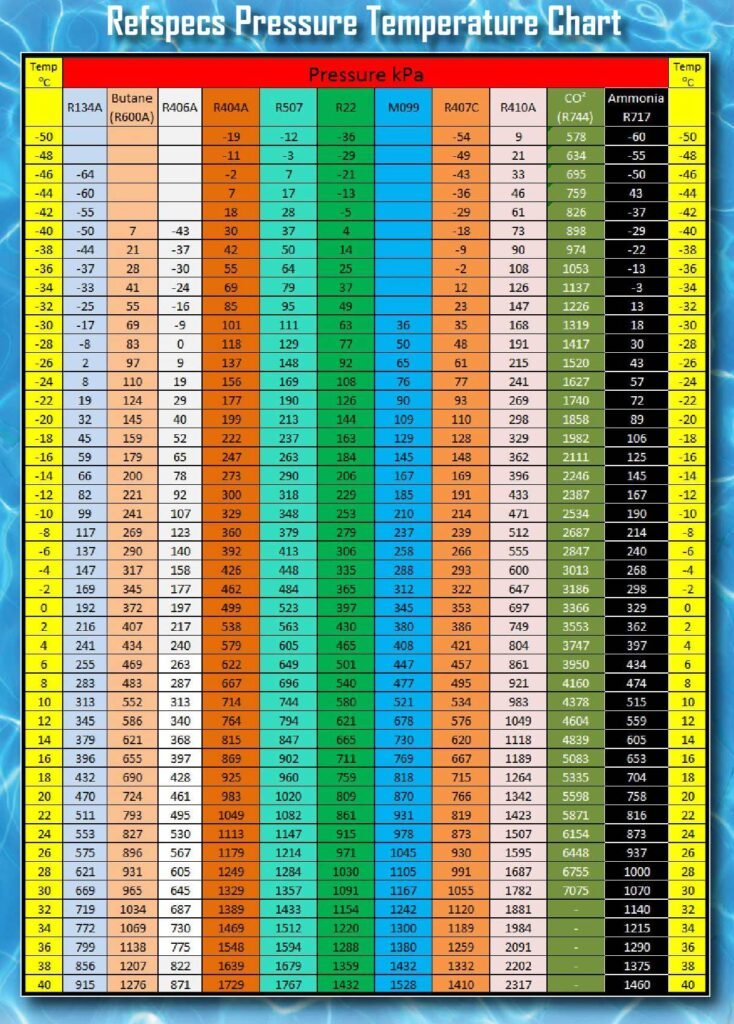
- PT Chart (Pressure-Temperature Chart): A physical card or an app that converts the pressure of a specific refrigerant (like R-410A or R-32) into its saturation temperature. (Note: Digital manifold gauges do this conversion automatically).
The Formula: Step-by-Step Math
Memorizing the how to calculate superheat formula is essential for passing your certification exams and working in the field.
The formula is incredibly simple:
Superheat = Actual Line Temperature – Saturation Temperature
Here is the step-by-step process on the job site:
Step 1: Measure the Suction Pressure
Hook your blue low-side hose to the service port on the large copper line (the suction line) at the outdoor condenser. Read the pressure. Let’s say it reads 118 PSIG on an R-410A system.
Step 2: Find the Saturation Temperature
Look at your PT Chart for R-410A. Find 118 PSIG. The corresponding temperature is 40°F. This is your Evaporator Saturation Temperature (the exact temperature where the refrigerant is boiling inside the indoor coil).
Step 3: Measure the Actual Line Temperature
Attach your pipe clamp thermometer to the suction line near the service port where you took the pressure reading. Make sure the pipe is clean and the clamp is tight. Let’s say the thermometer reads 52°F.
Step 4: Do the Math
Now that you have your readings, learning how to calculate superheat is just simple subtraction. Apply the how to calculate superheat formula:
- Actual Line Temp (52°F) – Saturation Temp (40°F) = 12°F Superheat
Congratulations. Your system has 12 degrees of superheat. But is that a good number? That depends on your metering device.
🛠️ Practice the Math
Knowing the formula is one thing, doing it under exam pressure is another. Try 20 randomized superheat and subcooling calculation questions now.
Target Superheat: Fixed Orifice vs. TXV
Having a superheat of 12°F doesn’t mean the system is perfectly charged. You have to know what your Target Superheat is.
Fixed Orifice (Piston) Systems
If the AC unit uses a fixed orifice (a simple brass fitting with a hole in it), the superheat will constantly change based on the indoor heat load and the outdoor temperature.
To find the Target Superheat for a fixed orifice, you must measure the Indoor Wet Bulb Temperature and the Outdoor Dry Bulb Temperature, and use a manufacturer’s charging chart or a sliding scale.
TXV (Thermostatic Expansion Valve) Systems
If the system has a TXV, you do not charge the system by superheat. According to major valve manufacturers like Sporlan, a TXV is designed to automatically maintain a constant superheat (usually between 10°F and 15°F) regardless of the load.
For TXV systems, you check superheat to verify the valve is working, but you actually charge the system by checking Subcooling on the liquid line.
Troubleshooting: What If Your Superheat is Wrong?
If you know how to calculate superheat, you possess the ultimate diagnostic tool. Here is what incorrect readings are telling you:
Low Superheat (e.g., 2°F or less)
This means liquid refrigerant is dangerously close to making it back to the compressor.
- Possible Causes: The system is overcharged with refrigerant, the indoor airflow is severely restricted (dirty filter, collapsed duct, dirty blower wheel), or the TXV is stuck wide open.
High Superheat (e.g., 25°F or more)
This means the refrigerant is boiling off way too early in the evaporator coil. The compressor is starving for returning vapor to keep it cool.
- Possible Causes: The system is undercharged (you have a leak), there is a restriction in the liquid line (plugged filter drier), or the TXV is stuck closed.
Conclusion: Don’t Guess. Calculate.
Whether you are taking your HVAC practice exams or standing in a customer’s backyard on a 100-degree day, mastering the refrigeration cycle is what separates the professionals from the parts-changers.
Now that you know the formula and the reasoning behind it, you have no excuse to rely on the “beer can cold” method ever again. Grab your thermometer, check your PT chart, and do the math.
Ready to test your troubleshooting skills?
The NATE and Journeyman exams are packed with scenario questions asking you to diagnose a system based on gauge readings. Don’t walk into the testing center unprepared.
📱 Master the Refrigeration Cycle
Access 1,000+ advanced diagnostic and calculation questions directly in your browser. Pass your certification exams with confidence.


0 Comments